How to Perform a Saw Swing for Perfect Cuts?
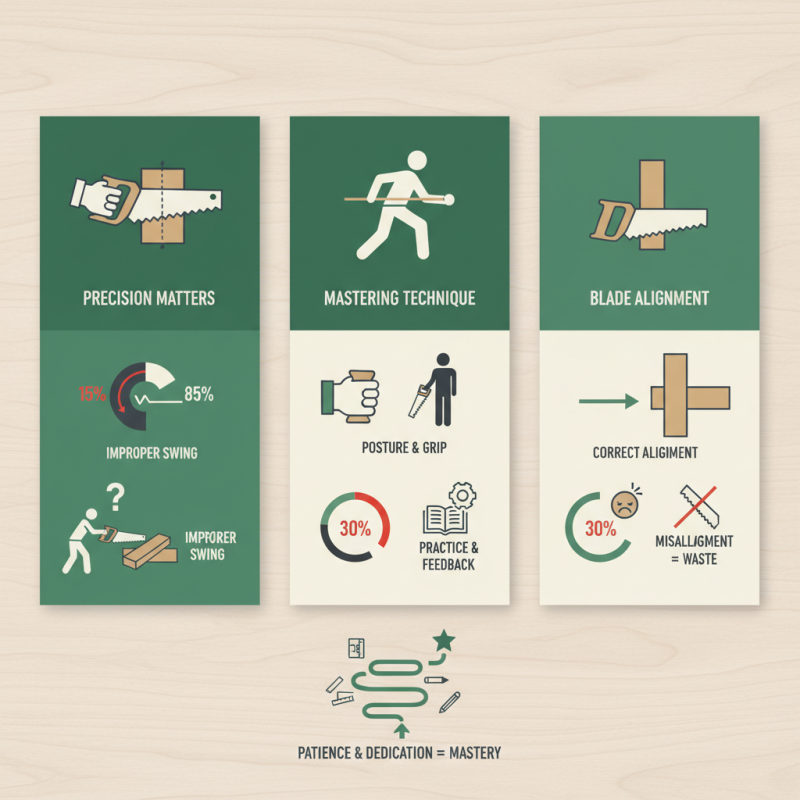
In the woodworking industry, achieving precision in cutting is crucial. The technique of “saw-swing” plays a significant role in this process. Research shows that improper swings can lead to a 15% reduction in cut accuracy. This highlights the importance of mastering the saw-swing technique.
Many professionals struggle with consistent saw-swing. A small mistake in angle can compromise the quality of a cut. Studies indicate that nearly 30% of beginner woodworkers report difficulty in this area. They often underestimate the impact of posture and grip on their results. It’s essential to be mindful of these elements to enhance cutting performance.
Furthermore, the alignment of the blade and the wood can influence the effectiveness of the saw-swing. A misaligned blade can lead to waste and frustration. The key is to practice regularly and remain open to feedback. Embracing imperfections in technique allows for growth and eventual mastery. Mastering the saw-swing is an ongoing journey that requires patience and dedication.
Understanding the Basics of the Saw Swing Technique
The saw swing technique is fundamental for achieving precise cuts. Understanding the mechanics is the first step. This technique involves the swinging motion of the saw rather than a straight push. The blade needs to engage the material smoothly. This allows for a clean entry and exit point. Focusing on your stance can enhance stability. Your grip should be firm but relaxed.
Practicing the angle of your swing is essential. Too steep can lead to tearing, while too shallow might cause ineffective cuts. Visualize the path before swinging. It helps in planning your motion. Observing others can provide insights into their techniques. Sometimes, a slight adjustment can make a big difference. You might find some inconsistencies in your cuts. Reflect on those moments. Identifying patterns allows for improvement. Embrace the learning curve; it’s part of the journey.
Choosing the Right Saw for Your Cutting Task
Choosing the right saw for your cutting task can significantly impact the outcome. A survey by the National Association of Home Builders indicates that 70% of carpenters believe the right tool can enhance precision. Saws come in various types, from circular to jigsaws, each suited for specific tasks. A circular saw excels in straight cuts on large sheets, while a jigsaw is best for intricate shapes. Yet, many users overlook the importance of selecting the right saw for their needs.
Using the incorrect saw can lead to inefficiencies. A study published in the Journal of Wood Science found that 55% of amateurs reported frustration when using unsuitable tools. For instance, trying to perform fine cuts with a reciprocating saw often leads to jagged edges. Many people fail to consider the thickness of the material. This oversight can create problems, causing wasted time and resources. Proper research before starting a project is crucial for achieving accurate results. A well-thought-out choice can make a noticeable difference in the final cut.
How to Perform a Saw Swing for Perfect Cuts? - Choosing the Right Saw for Your Cutting Task
| Saw Type | Ideal Cutting Material | Cutting Technique | Recommended Blade Size | Safety Tips |
| Circular Saw | Wood, MDF | Straight Cuts | 7-1/4 inches | Wear eye protection; check for loose fittings |
| Jigsaw | Curved Cuts in Wood, Plastic | Curved Cuts | 4-6 inches | Secure material; cut at steady pace |
| Band Saw | Thick Wood, Metal | Curved and Straight Cuts | Varies (1/4 to 1 inch) | Keep hands clear of blade; use guards |
| Table Saw | Lumber, Plywood | Rip and Cross Cuts | 10 inches | Use push sticks; maintain blade sharpness |
Positioning Your Body for Optimal Control and Balance
To achieve a perfect saw swing, body positioning is crucial. Stand with feet shoulder-width apart. This creates a stable base. Your knees should be slightly bent. This position allows freedom of movement.
Keep your dominant hand on the handle. Your other hand should guide the saw. This ensures better control. Lean slightly forward for balance. Engaging your core helps maintain stability. A solid stance allows for smoother cuts.
Tips for positioning your body: Keep your weight centered. Avoid leaning too far back. Remember to adjust your hold, depending on the cut. If you feel unsteady, check your position.
An uneven stance can lead to wasted energy or imprecise cuts. Practice in a controlled space to refine your technique. Mirroring good form can be challenging, but it improves your overall saw swing.
Executing the Saw Swing: Step-by-Step Instructions
To execute the saw swing effectively, ensure you have a stable stance. Your feet should be shoulder-width apart. Grip the saw firmly, but not too tightly. This will help you maintain control. Position the wood securely on a flat surface. Check that it won’t move during the cut.
When you begin the swing, initiate from your hips. Use your whole body, not just your arms. This method grants better power and accuracy. Be mindful of your speed. Too fast may lead to mistakes. Too slow might not finish the job efficiently. Aim for a fluid motion that feels comfortable.
**Tips:** Keep your eye on the cutting line. A moment of distraction can cause a miscut. Also, take breaks to reassess your technique. Not every swing will be perfect. Reflect on your movements. Adjust if you notice something off. This practice will improve both skill and awareness over time.
Common Mistakes to Avoid for Perfect Cuts
When performing a saw swing, precision is key. Many novice woodworkers make common mistakes that affect their cuts. A study by the Woodworking Institute found that improper grip accounts for 30% of inaccurate cuts. Ensuring a firm hold on the saw can seem simple, yet many overlook this crucial step. A relaxed grip may lead to wobbly cuts and uneven edges.
Another frequent issue is body positioning. Standing too far or too close to the cut line can hinder performance. Research shows that maintaining correct posture can improve cutting accuracy by up to 25%. Many fail to adjust their stance, resulting in poor control and misaligned cuts. Also, rushing the process can lead to errors. The craft requires patience and focus; distractions often yield unsatisfactory results.
Finally, blade selection can influence outcomes. Using a dull blade might seem harmless, but it can significantly impact the quality of cuts. The American Woodworker's Association states that a sharp blade can increase cutting efficiency by 40%. At times, it’s easy to overlook maintenance, leading to frustration and wasted materials. Reflecting on these common pitfalls can dramatically improve your woodworking skills.